Saturday, April 24, 2010

Press Mold Grotesks pt 2, Stick Grenade, Pater Furore

I've been a bit ill this week and so I've felt too scattered to concentrate on any project for long.  I put brush to Pact and have more Pacters primed and a couple base-coated.  Army Painter primers are the best I have ever worked with, and they come in colors other than black, white and grey!  I'm sticking with black on the Pact, since that's how I've painted all of them so far, but I'm looking forward to trying out all their colors.

While I was feeling a bit meh I decided to finish up the press molds I touched on a few weeks ago.  It's quick and simple to clean up the pressed greenstuff and glue it on.  I've gone a bit over the top and given these three straps as if they simply unbuckled their holy facemask.  The straps are bits of brass left over from the ForgeWorld chaos icon sets I've been using.  I simply cut them to the right length and glued them on, they're solid and thin, perfect.

Here are the three press molded Grotesks.  I couldn't tell when I made the mold but it was a bit shallow.  It appears I also rocked the head while pushing it into the mold since these came out looking more flat than the original.  All is well since the Pact have a rough edge to their equipment and I'm sure each Grotesk is either hand made or customized after issuing.


Here I've cut away the excess from one of the Grotesks.  I've also trimmed the back flat so it will easily glue to the chest armor of its future lucky Pacter.

This is one of the ones that was rocked side to side while I was pressing its original into the greenstuff.  It looks considerably wider as a result, but that's okay.  This autocannon gunner looks all the better for the added detail.
On this life-ward for my Etogaur you might be able to see the brass acting as straps hanging from his helmet.

On the right side of the picture, by his left ear is a brass etch strap.  You can see how thin the molded Grotesk is from this angle.
This suave gentleman is sporting the season's latest fashion in stick grenades.  Made from plastic rod inside aluminum tubing.  The knife and pouch are particularly nasty bits from the vampire counts grave guard box, the one I used to make my carapace veterans, aka Blood Pact Death Brigade.


And here he is even more stylish with his new Grotesk!  (Note the tiny bit of brass etch strap poking out above the Grotesk.  I've reconciled with the idea of my ever decreasing sanity as it relates to toy soldiers, thanks for asking.)


Last of all is Pater Furore, to whip the boys up into a frothing rage.  He counts as a priest with an eviscerator and a shotgun.  I used bits from the fantasy empire flagellants and topped it with an ancient necromunda pit-slave saw I've had floating around my bits box forever.
Speaking of necromunda, here's his boom-stick.  A shotgun from a necromunda sprue of weapons likewise floating around my bitsbox and generally making a nuisance of itself since the dawn of time.

Friday, April 16, 2010

100 thank-yous, MaxMini alternate heads, and a sneak peek.


The 100 thank yous go out to the 100 followers of this blog, a recent occurrence here at PaDA.  Thanks to each of you for your input, it helps the creative process immeasurably.  Inspiration is key to sticking with a project and all of you add to that inspiration.  It's amazing what a community can add to an experience.

I recently found that my favorite bits seller (Ebay's Hord O Bits) started carrying some of MaxMini's conversion bits, including the heads I use for the Blood Pact.  So I ordered a few extra bits and bobs since I wasn't paying international shipping.  I picked up their Steam Knight Helmets for use as some Night Lords with particularly old armor, and some Skull Tribe Helmets for some skull faced Night Lord action.  Unfortunately it seems the Skull Tribe heads are a bit small for the Astartes frame, so they may find their way onto a Blood Pact honor guard.

(The sneak peek is special 100th follower event where you can see the cluttered workstation in the background of the pictures below.  Enjoy the mess. :) )


Friday, April 9, 2010

Carapace Blood Pact, Baal Pronunciation Guide & Press mold

Welcome back faithful readers, my Blood Pact continues to grow.  They attended a team tournament where my team-mate and I came in third.  I've been working on a carapace armored veteran (death brigade) squad, as well as a halftrack, a valkyrie with rotors instead of wings, and putting parts together to make a 6 wheeled STeG-4. I've also received a request (through my User Profile email link) for a press-mold tutorial for the grotesks and while I think others out there have done it better, none have done this specifically so I thought I would give it a try.

I'll start with my editorial and make it brief.  Since the new Blood Angels codex out and I've started hearing people mispronounce Baal, I am taken back to my misty first experiences in a local gaming store.  People were talking about putting Oh-grines in a shim-ra APC and the god kuh-horn grappled with his nemesis Tiz-neech.  With gamer culture's status based on information and it's application, there is always controversy over pronunciation.  The kinds of games we play and books we read often make up words or draw from obscure references, but this one is easy folks.  The Baal Predator, it's pronounced bayl, or ba-all.  Since I'm not too far out of University I still feel the need to cite so here you go: (there's even clicky sound links so you can hear it for yourself)
http://www.merriam-webster.com/dictionary/baal
http://dictionary.reference.com/browse/baal  (the second one, since I doubt the Blood Angels are naming tanks after Australian slang for "no".)
http://en.wikipedia.org/wiki/Ba'al

Right, now that's sorted and I feel better.  I've needed to get that off my chest since the last codex.

Presenting my Blood Pact Death Brigade assault troops, idea stolen from SpikeyBits.  On to the pictures!

Flamer, shotgun and blood priest in the back- ground.
Squad leader on the left, converted heavy flamer on the right.
The second regular flamer and support.


For those of you that have stayed with me this long I have for you, as a treat, my modest press mold tutorial:

1:  Clump of freshly mixed Greenstuff in a shallow, open container.  In this case a spare base.
2:  Fill up the space.
3:  Oil!
4:  A little oil goes a long way, I use the cap and.. wait that was going to sound wrong.  Just put some oil on the greenstuff while its still curing.
5:  Like so.

6:  Take a small, relatively flat piece who's detail you wish to copy.  The Maxmini heads work even though they are curved.  Press the piece in firmly, the oil is there to help with the removal of the piece as greenstuff is sticky and if it stretches it will distort any casting you do.  Ideally you want the greenstuff to not move or stick except to allow each impression.  I've heard baby powder will also work for this, but have not tried it myself.

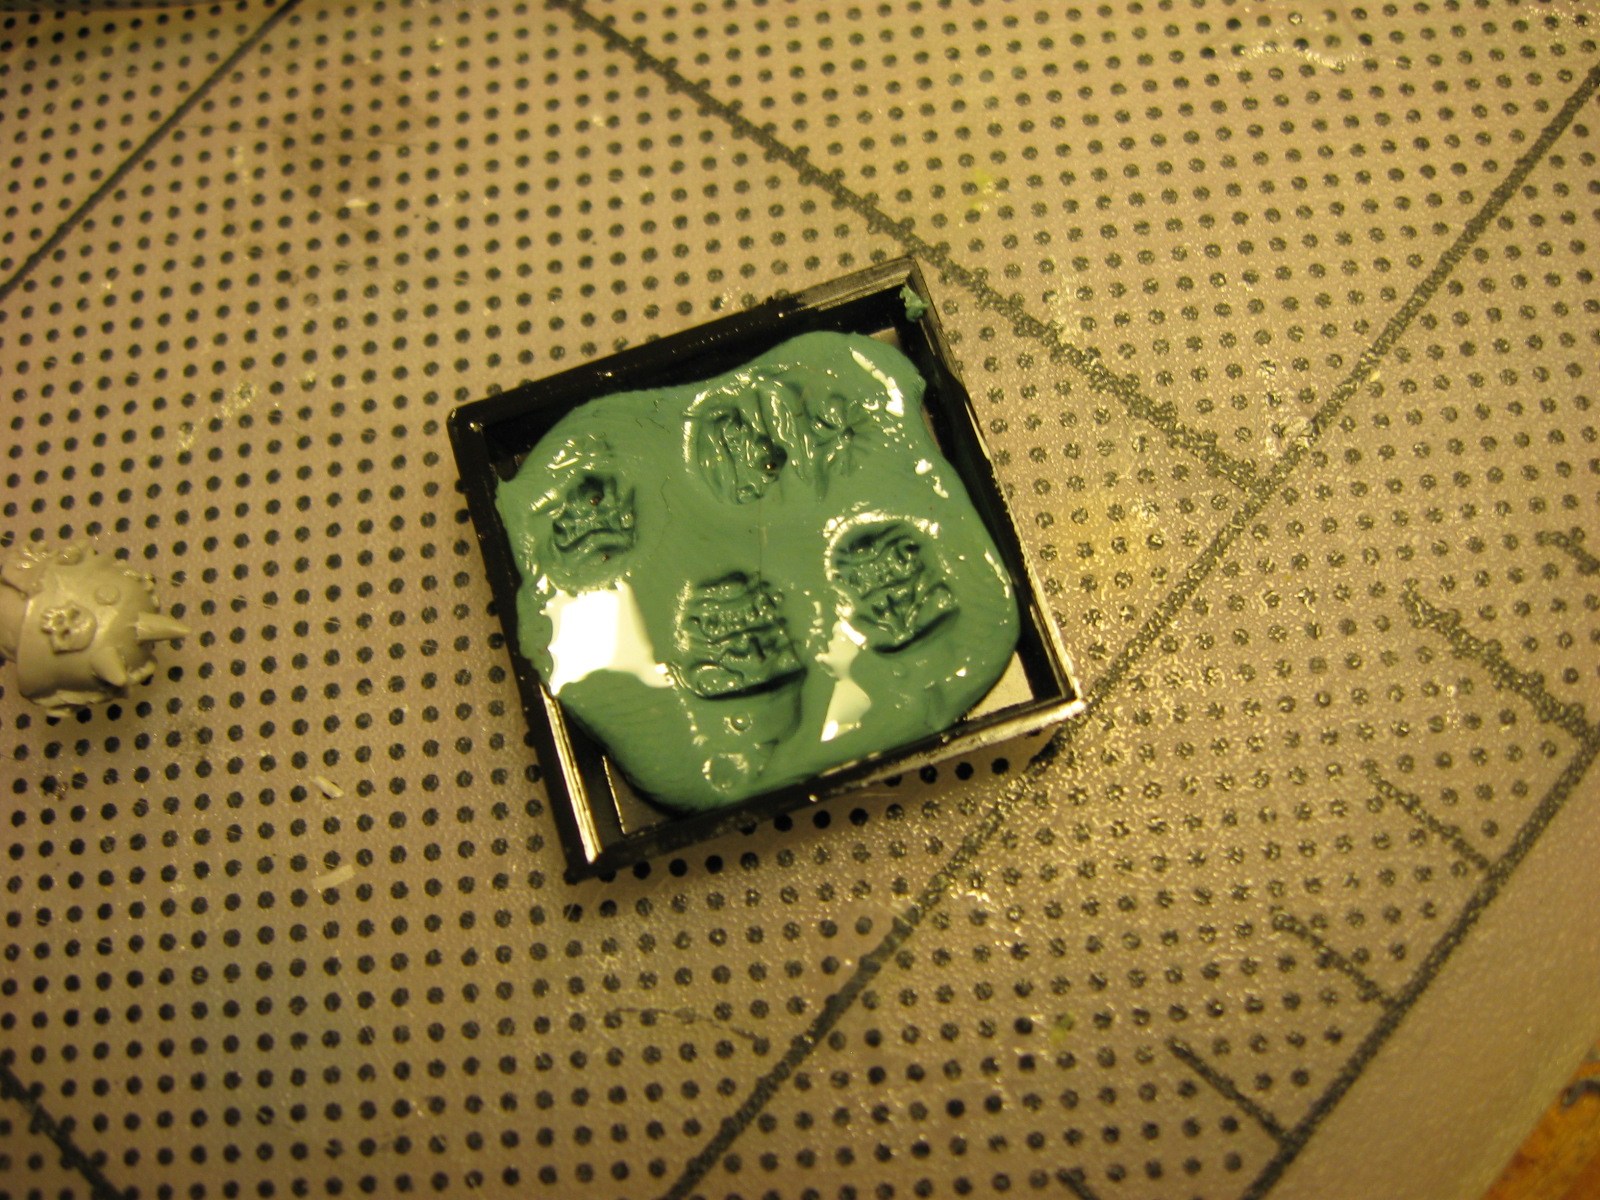
7:  There we go, four press molds.  Wait for the greenstuff to dry.  The next step is just to add a bit more oil, and push some freshly mixed greenstuff into each mold where it will take on the shape of the impression.  Wait for it to dry and remove it from the mold.  Cut off any excess greenstuff with a sharp blade and you're set.
And here's an example.  The grotesk hanging from the pacter on the left was actually press-molded from the pacter on the right.