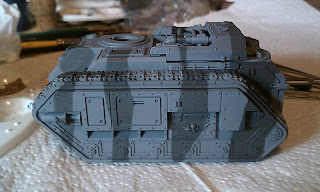
Here the masking process starts. The model was first primed with Army Painter's Uniform Grey. Remember to press down on the sides of the tape with a pencil tip to make sure the tape conforms to rivets and smaller details.
Here it is after the masking tape is off. The stripes were sprayed with Montana Steel Grey. While Montana brand makes excellent paints with low pressure nozzles, be careful to stay close to the model or some "dusting" can occur.
With a simple build under my belt I thought I'd try some Masterclass techniques and as everyone who's looked at the book knows, the only way to do that is with some Death Korps of Krieg. Luckily I had a spare commander or two laying around and tossed one in the turret. The following pictures are my first attempt at masking camouflage and pin washing. (Pin washing is a fancy sounding technique wherein you don't wash the entire model, just the rivets and the panel lines.) This gives heightened contrast and actually lets you see all those tiny details from across the room. Simple to do, with great results. With the pin wash picture, it's worth clicking the link for the full size as the effect is pretty subtle.
Before pin washing.
After pin washing with third parts Gryphonne Sepia, Ogryn Flesh and water.
Next up will be the sponge-weathering you may have seen on my Blood Pact tank previously. Then it's a gloss coat and I'll try out some oil paints on a model for the first time. Exciting!
The rest of the process:


I would agree with your comments about the Forgeworld Masterclass volume one.
ReplyDeleteA great piece of inspiration and full of hints and tricks.
Your tank models look fantastic, very well done.
Tony
http://dampfpanzerwagon.blogspot.com/
Funny, I'm working on a Marauder Destroyer with a gray camo scheme. I don't have the Masterclass book yet though, so I'm learning on the internet and winging it... pun intended.
ReplyDelete@Tony: Thank you very much. I've always been intimidated by what I saw as "advanced techniques" like weathering and masking, but they're not terribly difficult and really quite fun.
ReplyDelete@The Inner Geek: Fantastic Marauder Destroyer you have there! I believe our two vehicles must be fighting on the same battlefield. There are quite a few resources on the internet, perhaps you could pool your links and post them to the community?
I love your choice of colors- they scream "intimidating sobriety." Or rather, they say it in resonant, dignified tones.
ReplyDelete@hoppergrass: Ah,thank you. I was going for the WW1 "Line of soldiers smoking in a trench waiting for the signal to go over the top and walk, not run, 200 yards without cover, through razor wire and under machine gun fire." feel to it.
ReplyDelete