Monday, July 19, 2010

ForgeWorld Masterclass techniques

While I was at Warhammer World I picked up a few things from forgeword, or rather ordered them to be delivered back home.  One of these was the Masterclass Volume 1 and it is a beauty.  I highly recommend picking it up for the wealth of simple and effective tips within.  (Not to mention all the complex and effective tips also jammed in there!)

Here the masking process starts.  The model was first primed with Army Painter's Uniform Grey.  Remember to press down on the sides of the tape with a pencil tip to make sure the tape conforms to rivets and smaller details.

As I got home and looked at all my conversion and scratchbuild projects I began to yearn for simpler days.  A bog standard army, straight out of the box began to appeal.  I considered selling all my armies and starting over, but I've had that feeling before and I knew it would pass.  To scratch the simple-build itch, I assembled a Hellhound that's been sitting in its box since my last birthday.  It's a great kit, I just hadn't gotten around to it and wasn't sure how to make it fit in with the Blood Pact.  Let me put this in perspective for you: sometime's I'll spend hours, days even, just building and converting a tank or a handful of infantry, so when I built this hellhound in less than an hour I was amazed.  Well done GW, your new kits are better and better.

Here it is after the masking tape is off.  The stripes were sprayed with Montana Steel Grey.  While Montana brand makes excellent paints with low pressure nozzles, be careful to stay close to the model or some "dusting" can occur.

With a simple build under my belt I thought I'd try some Masterclass techniques and as everyone who's looked at the book knows, the only way to do that is with some Death Korps of Krieg.  Luckily I had a spare commander or two laying around and tossed one in the turret.  The following pictures are my first attempt at masking camouflage and pin washing.  (Pin washing is a fancy sounding technique wherein you don't wash the entire model, just the rivets and the panel lines.)  This gives heightened contrast and actually lets you see all those tiny details from across the room.  Simple to do, with great results.  With the pin wash picture, it's worth clicking the link for the full size as the effect is pretty subtle.

 Before pin washing.

After pin washing with third parts Gryphonne Sepia, Ogryn Flesh and water.


Next up will be the sponge-weathering you may have seen on my Blood Pact tank previously.  Then it's a gloss coat and I'll try out some oil paints on a model for the first time.  Exciting!
The rest of the process:


Sunday, June 13, 2010

Blood Pact N20 halftrack breakthrough!

Well after my last blog entry went over like a lead balloon, and I am on holiday in London right now, I will keep this short.

I haven't been playing with the Blood Pact army I want to have because I couldn't come up with something to replace chimeras.  I wanted to use either the N20 halftrack, depicted in Dan Abnett's books as close support flame-spouting vehicles, or the STeG-4, depicted as a 6 wheeled armored car, but what models to use?  I considered using the six wheeled IFV for the Oni faction of AT 43.  (Pictures here, towards the bottom)  Scratch building was another option, but it would have to be simple so as to not drive me insane, the Pact already has enough modding and converting.

Enter paper models.  I saw a post on warseer and set upon the idea.  Some searching of the Tubes and I discovered several free paper models for WW2.  They looked complicated.  I was all set to order some of the 6 wheeled destroyers from AT 43, even had the order screen up, when I thought "Well, I should at least try one out."  Less than an hour later we have this:

Paper test model, paper pattern, plasticard pattern.


Huh, look at that.  Those tonka toy tires I found a while back are the perfect size.  Thanks again Shawn!


Looks good so far.


Not in scale for a WW2 halftrack, but perfect for a 40k chimera.


12 Pacters could easily fit in there.


The curved section by the door was the most difficult part, the rest is right angles.


Oh yes.  It needs a bit of putty in the gaps but it was super simple to make, will be easy to detail, easy to repeat, and I can fit 3 patterns on a $5 sheet of plasticard.

Oh yes.

I return from Blighty on the 21st, normal service will return after.

Saturday, June 5, 2010

"What draws me to an Army?", Night Lord Rhino weathering, questionable Dreadnought.

What draws me to an Army?
(Pictures current of models below the text for those not interested.)

I've been having so much fun painting this Night Lords rhino that I'm posting a second time in one week!  Some backstory; the Night Lords were the first 40k army I finished.  I had 1850 points and took them to one or two Seattle Grand Tournaments around the year 2000.  They were my return to the hobby and my painting style was bright and clean, as was portrayed in White Dwarf at the time.  Old, old pictures can be found here, and funny enough over at Bell of Lost Souls.  It seems someone over there picked up my army, or who knows, they may have been the person I sold it to all those years ago.


The point being that something has always drawn me to these brutal killers.  Their paint scheme is striking, and adheres to Bsmoove's excellent hypothesis on color palette choice, but that isn't all of it.  I am drawn to the theme of a force and for several editions their theme seemed to waver, but the use of fear and unconventional tactics remained constant.  It is this manipulative nature that brings me back to them.  Like Bsmoove and myself, the Night Lords are a D4.  They seek weakness and strike where they will do the most damage.  They do not play by the rules, they seek to change the rules and so change the conflict.


This actually reminds me of myself while playing in one tournament I realized a friend of mine's morale would crumble whenever his favorite unit was destroyed, so I changed my battle plan to do everything in my power to obliterate that unit.  I told him exactly what I did afterward, and he tells me he still remembers that game and how it helped him enjoy playing the game rather than winning.  I like to call that using my d4viousness for Awesome.

I also enjoy stories about tragic heroes.  All space marines exemplify that to some extent, but the Dark Angels and Night Lords are aware of what they have lost and they give it willingly because the goal is worth it.  The poor Dark Angels have given up their honor in an attempt to keep their pride, while the Night Lords gave up their humanity to become the monsters that keep humanity safe.  The Night Lords, VIII legion never really took part in the Great Crusade like their brothers did.  Instead they followed in the wake and put down revolts and insurgencies, much as their Primarch ended crime on his home world.  They did this with fear and terror just as their Primarch did, safe in the knowledge that they sacrificed the few to insure cohesion and manifest destiny of greater humanity.  Through this devious deception called fear the VIII legion brought worlds back into compliance with much less destruction or loss of life than an assault would cause.


 Theme and appearance are of primary concern for me when playing or choosing an army.  The reason I have played every army in 40k at least once (besides Daemons and Tyranids)?  I find either a theme or an appearance I like and try to create something out of it, but over the course of play or building the army I find things I dislike.  For example, I love the way the Tau look but their play style and story (which are related to my mind) are not entertaining for me.

I hope this has been as useful for all of you as it has been for me.  I'm not sure it will stop my tendency to collect multiple armies, but it certainly helped me to identify my own tendencies and what I like in collecting.  On to the pictures!


Here is my freehand lightning bolt, required for every Night Lord vehicle.  Not the paint chipping and rusting.  In particular the smoke launchers have been painted using the rust technique on A Gentleman's Ones here.  Washes should bring the paint chipping together and I'll experiment with some weathering powders as well.


Patina wash went on a little too thick on this side, I'll be pushing it back with Devlan Mud washes and building the Brass back up.


This is the product of the same rust wash I used on my Blood Pact tank here.  It is basically a weathering powder suspended in alcohol and sells under the name RustAll.


Again, the patina wash got away from me a little around the vision ports.  I'm looking forward to seeing how powders can tone it down and how they will change the appearance of the rhino in general.


Rust, patina and tons of chips!  Fuel cylinders to receive copious washes.


What do you think?  Obviously the spikes' rails will be trimmed back in the final product.  Is it too much, or does it bring it more in line with a traitor legion?


And again.


Bonus image for loyal viewers!  Not related to 40k, but it made me laugh today when I was checking to see if my phone would work while I am in London.  Verison geography fail.

Thursday, June 3, 2010

Night Lords Rhino, painting experiment and Rhino

This has taken forever, as test models usually do.  This has been multiplied by the fact that it is a vehicle with a lot of surface space and some ForgeWorld additions.  I knew I wanted to do something different, to be a little more creative and "painterly" rather than sticking to my old formulas.  The muse had struck, art was a must.


I wanted to finish it up so I could post all the pictures in one post, but rather than make you wait any long I decided to toss these up.  This is the stage I am at.  The ForgeWorld additions are done, basic hull coloring is done.  Weathering and touch-ups are on the to-do list.


And here's how we got there.  After building it and priming it in the last blog entry, the first thing I did was to give it a wash of watered down black paint.  Then I went crazy with  a brush and some blue paint.  Stage one:


Stage two.  Fading in a brighter blue from the edges.  Interestingly this works like camouflage.  Up close you can see the pattern, but take a step back and it looks like a perfectly smooth blending from light to dark.


From the side it shows the highlighting process better since there is more variation.

Which brings us back to the current stage.  I went for a bleached look, thinking that once the wings were bright red and the stone circle a noble yellow, but that had faded in time.  Adding grey to red is an interesting experience.  It felt like I was slowly losing my color perception, since all I was really doing by adding grey was taking the red out of the, well red.


Man do the ForgeWorld kits have a lot of detail on them!  I had no idea until I started painting these.  Each individual tooth, the skull edges are undercut, the eye sockets are nice and deep, the wings.. you get the idea.

You may have seen the start of the weathering on the tracks.  Here is more on the tech bits.  Look for patina on the bronze piping and a great deal of paint chipping all over the hull.  I will then experiment with ground pastels as weathering powders!

Sunday, May 16, 2010

Piping a Night Lords rhino, building a Chaos Venerable Dreadnought & a Lord.

First of all, I have to thank amaximus for his great idea; adding piping to a chaos rhino, without him my rhino would not look so good.  Right, that's out of the way so let's get on with it shall we?  Adding the piping that trims the armor of all good (bad?) chaos marines to a vehicle is deceptively easy.  If you can find a model store that sells plasticard (Evergreen and Plastruct are the two big ones) simply pick up some .020 x .040" strip styrene, cut it to the correct length and glue it on.  Then cut the corners off one bit and glue on your sharp arrow-like piece, easy-peasy.

 Above you can see I've lined the front depressions, as well as the rear exhaust.


There was a large gap between the aft hull sides and the top, so it got some piping.


After some Army Painter blue primer, they blend right in.  That will change later when they will be painted brass like the Night Lords' armor.


The large power cell is from the new Sentinel kit and fits perfectly.  Much like the strip styrene it is less of a conversion and more like slapping on pieces that look good.


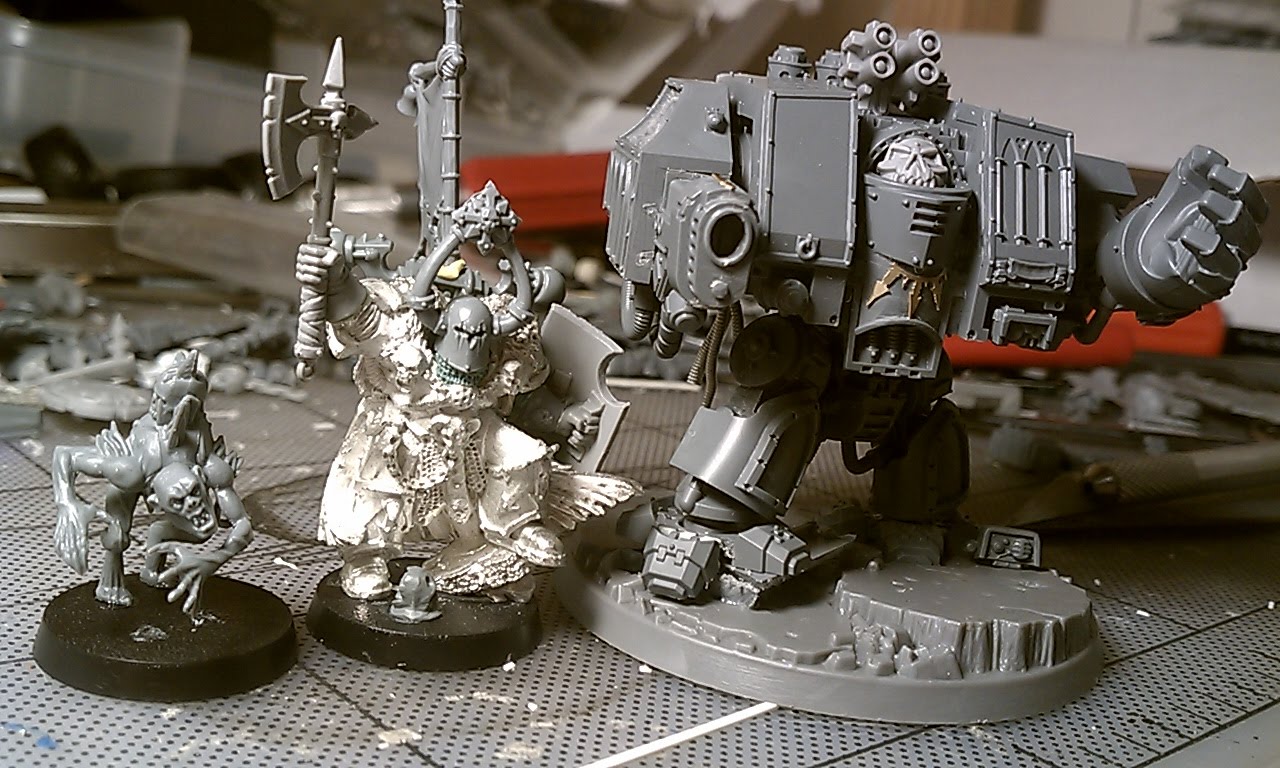
Since the first moment I saw the first images of the new plastic Venerable Dreadnought a million ideas ran through my mind, "What if I gave it a terminator helmet?" (looks good)  "What if I gave it a steam knight helmet from MaxMini?" (looks bad)  "Why would anyone make an armored machine to protect a crippled marine pilot and then let him peek out so he can be shot in the face, oh and let's make a bullet trap around his helmet just to make sure it happens.."  Ahem.  So this is my answer to the underlying question, "How could I use that kit to make a Chaos Dreadnought?"  Here is my answer:

His head is an old chaos marauder shoulder pad.  It is actually the one I used to make the toothed gorget on my Blood Pact officers.


I like to think the astartes pilot is nestled safely in the middle of the vehicle and the head is merely a sensor pod to help keep the pilot's perceptions as close to a human body as possible.  A human body with tiny legs, huge arms and its head in the middle of its chest.


I pondered what to do for a Dark Mechanicum symbol since all the Mechanicus symbols had 12 teeth on their cog they did not easily become a chaos star.  The solution stared up at me from my bits box in the form of two resin skulls from the Forge World rogue psyker'.  Cybernetic eye on a skull?  Check.  Eight pointed halo?  Check.  Add to that half a chaos star from Forge World's etched brass and I think it gets the job done.

 
When not destroying the followers of the Unfaithful Emperor, Chaos Dreadnoughts enjoy such hobbies as being chained to the floor while plugged in to a corrupted cogitator to keep them (in)sane.  Hence the giant hooks for attaching chains and the mass of hoses.


Lastly I picked up a metal Chaos Lord from amaximus and although I did not like the way the model was posed, I saw potential in adding to it.  I normally do not like astartes that look like chaos knights, but this guy is just on this side of that line for me.  Can you believe it is even the same model?  No really, follow that link and then look at mine.

The back banner was something of an afterthought.  Should it stay or should it go?

I had my first go at sculpting chainmail with his neck armor and I have to say I am happy with the result.

Back banner yes?  Back banner no?  For those wondering it is from the Skaven clanrat box.

Rotate!

Family portrait.  What's that on the far left, you say?  Why that is a fantasy plastic ghoul who may be standing in for daemons in the Night Lord army.

Wednesday, May 5, 2010

Blood Pact Valkyrie mock-up, Painted Night Lord

I'm still frustrated with what to do about chimeras.  I converted a chimera halftrack with some toy wheels, plasticard, lots of chopping and not a small amount of swearing.  It looks ok, but there's no way I'm doing that again.  More about that next blog.

In frustration I turned to the Valkyrie I've show you before and thought, "How could I make this more Pact-ish?  How could I lower the tech level?"  I've been thinking of this conversion for a while, but it wasn't until a friend pointed out the nifty stock tracking feature Toys R Us has, that I was able to find one.  The Avatar helicopter, aka fodder for the Urdeshi Forges.


 To get an idea of what I'm going for, here's the valk with the toy rotors, winglets forward.  After looking at this picture again, I may go with winglets back, to fill up the space where the wing would normally be.
 And out of the box.  As you can see, they take up about the same amount of space, but look far more primitive.
 The toy comes with some nice landing skids as well.  They happen to fit onto the bottom perfectly.


 Not much happening in the world of painting.  I think I may be burning out on painting the Pact, but I only have a couple dozen infantry left so I've based, and primed like crazy.  For another break, another Night Lord.

Again I primed it with Army Painter's blue primer.  Then followed a wash of watered down black paint before building up highlights again with a mix of several blues.  I tested out a vallejo paint called Verdigris Glaze for the patina and it worked alright.  It's a little white for my tastes, but goes on nicely.
The hammer has various reds and browns stippled on the upper side to represent dried blood, with fresh blood on the downward side.
The rusty backpack arms were achieved by globbing dried out GW terracotta on, which gives it great color and texture.  I then lightly drybrushed boltgun over the surface to pick out the applied texture.